Posts

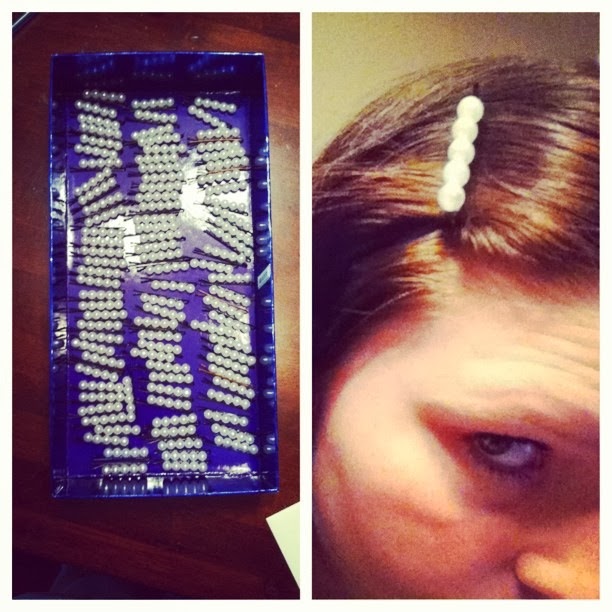
DIY Pearl Bobby Pins
Image
Hey guys! Sorry it's taken sooooo long to do another blog post, school has been taking up a lot of my time lately. Anyway I went alum from my sorority about two semesters ago and I decided to make a little gift for all the girls to remember me. I was searching all over for an easy way to make a hair pin and this idea came to me when I went shopping for the materials. These were seriously so cheap and didn't take very long to make!  Materials: Pearl Beads $3.99 at WalMart Bobby Pins $2.00 at Walmart You will also need a hot glue gun! Directions: First you want to go ahead and have your hot glue gun ready to go.  I started out gluing each bead individually on the bobby pin and I realized it was going to take FOREVER so I decided I would glue the beads together first.    So I hot glued 5 beads together, because that is how many would fit on each bobby pin. Once you have glued all the beads together...

Cheap, Easy, and Delicious Bean Dip Recipe!

Image
So this weekend I had a few friends over to my place and I decided to make something really quick, so I went to the store and spent less than $5 on this super easy Bean Dip. I hope you all enjoy it :) Bean Dip Recipe Ingredients : A 16 oz can of Fat Free Refried Beans 2 cups of Salsa 1 cup of Sour Cream Bag of Tortilla Chips Directions : Put all of the ingredients in a mixing bowl and mix it, until all the ingredients are incorporated together. Enjoy with a bag of Tortilla Chips. Extremely easy, yet so good! Below are the ingredients I used and the prices for them to show you how cheap this dip really is. Can of Fat Free Refried Beans - 89 cents  Jar of Salsa - $2  Sour Cream - 99 cents Bag of Tortilla Chips - 99 cents

Victoria's Secret Semi-Annual Sale!

Image
I don't know about you, but I really only get stuff from Victoria's Secret when it's on-sale, especially during the semi-annual sale. So the semi-annual sale started January 2nd and I completely forgot that it had started and went to Victoria's Secret right when I got off of work that day. It was crazy at the first VS I went to, but I got in and out as fast as possible and went to a second VS because some things that are on sale vary store to store. I spent a lot of money, and will continue to, because this sale goes on until the end of the month! I have gotten mainly a lot of fragrances, because if you know me personally I'm the perfume princess, I'm addicted to them. Anyway here is everything I have gotten so far, if I get more things I will make sure to post them! Lip Gloss - FREE :) Clutch - FREE :)  So I asked my brother to get me a Victoria's Secret gift card for Christmas, so I would have more money to spen...

DIY French Manicure

Image
  So this past weekend I had formal (sorority prom pretty much), and instead of going out and getting my nails done I decided to give myself a french manicure, I've been doing it this way for a while now and have really gotten the hang of it. It is super easy and doesn't take much time to do! Materials needed: Hole reinforcers (white circle stickers used to fixed a ripped hole for a piece of paper) White Nail Polish Nude/Light Pink Nail Polish Clear/Topcoat Nail Polish Q-Tips Finger Nail Polish Remover The nail polishes that I used in this tutorial are in the pictures below. First things first have your nails shaped the way you want them and how long you want them to be. Next you want to place the stickers on your nail. Place them below your nail line, I did mine pretty far down because I wanted a little thicker tip this time, but it all depends on your preference. After you have all your stickers on your nails th...

DIY Tie-Dye

Image
Hey guys! I know it's been a while since I've had a new post, but I have been extremely busy with school and a moving situation. Now I finally have some free time, so I am going to show you guys how I tie-dye. :) First things first you are going to need a few things: 1. Actual tie-dye 2. Squirt bottles to hold the dye (mine are hair dye bottles from Sally's) 3. Salt 4. Rubber Bands 5. Piece of clothing that is white and 100% cotton 6. Trash bag 7. Ziploc bag or a grocery bag (make sure there are no holes in it) 8. Plastic gloves 9. Wear clothes you don't mind getting dirty 10. A place outside to do the job So what you want to do first is set everything up. Take your trash bag and do not open it, leave it the it is and lay it down flat outside (I put mine on the grass). Next thing you want to do is get your piece of clothing ready, I am doing a shirt in this tutorial. Lay your shirt down flat.  Then you are going to take your...